
MENU
|
Dash Mounted Power Outlet Fitting Guide
![]()
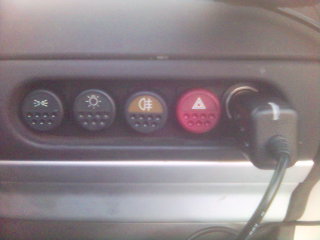
PS. if you like the red hazard lamp switch it's Peugeot part number 655321 (Ł13.45)
You will need:
- Philips screwdriver
- Flat bladed screwdriver
- Rag or towel
- Half-round file
- Long nose pliers
- Electrical tape
This is easiest done by sliding a flat blade screwdriver (covered in a rag to prevent scratching) between the bottom of the bezel and the aluminium dash. Push the plastic bezel upwards then pull it free.
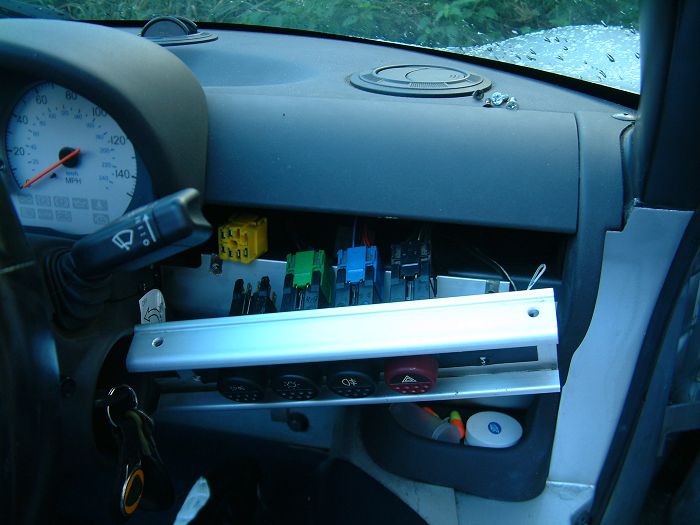
Two screws are at the top and two are on the front. The front screw heads might be covered by the black trim. Don't try to peel off the trim, just push the screwdriver straight through.
Push the panel down and then forward to release it from the dash. Take your rag/towel and drape it over the steering column cowling to prevent the dash panel from scratching it on the way out.
Make a note of which switch connects to each coloured connector block then disconnect them. Put the dash panel to one side for a moment.

This may be connected to the blanking switch or loose inside the dash. Pull it free so you can get to the block connector easily as shown in the photo.
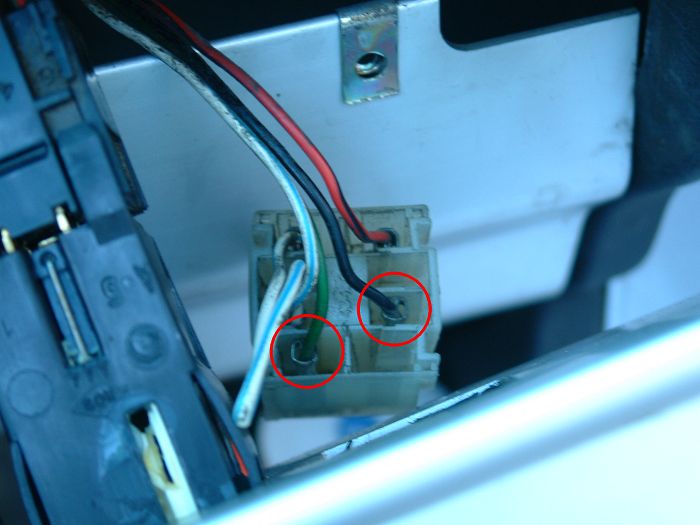 You will need the black (earth) and green (+12V) wires from the 5th switch block connector. Using a pair of long nose pliers, push the contacts through from the front of the connector. Cable-tie or duck-tape the connector back inside the dash so it won't rattle around in future.
We now have a classic "round peg in a square hole" situation :-)
The diameter of the power outlet is slightly larger than the square hole. Take a half-round file and slightly enlarge the square hole by applying the round part of the file to each edge. You only need to remove about 1mm from each edge. I think you'll still be able to fit a regular switch to the hole in the future but I've not tested this.
Firstly, remove the blanking plug entirely from the power outlet, including the retaining ring (we'll need this again shortly). Then rotate the power outlet to find the best fit and push it home.

Luckily the spade connectors from the 5th switch fit perfectly onto the power outlet terminals. To prevent short-circuits, wrap the black wire in electrical tape. Then connect the black wire to the outside terminal and the green wire to the central terminal. The photograph shows the power outlet separate from the dash plate to better illustrate the connections.
Reconnect the battery and use the standard cigarette lighter in the power outlet to test it.
Referring to your colour-coded notes, reconnect the switches to their corresponding connector blocks. To improve longevity of the switches you may want to wrap the whole lot in duck-tape to prevent dirt ingress.
Push the blanking plug into the power outlet so that the original retaining ring sits at the top of the plastic bezel to aid removal when necessary.
|
© 04-Nov-2005 |