MENU
|
Elise Upgrade Fitting Reports
Fitting MotoBuild Silenced Cat Pipe
6th November 2000Thought I'd report back on fitting the silenced cat-rep pipe from Moto-Build this weekend.
I did this on Saturday morning (seeing as it was dry) lying on the driveway under the car. I didn't have a suitable jack so I didn't bother with that and it wasn't a problem.
The undertray came off no problem. I've seen it done many times at dealers but didn't appreciate how long it would take without an air-gun! I sprayed WD40 all over the cat's 6 bolts and left it for a few minutes while I checked my tyre pressures. The car is 13 months old at 23.5k miles and the bolts were rusty but not badly corroded.
The bolts were pretty well stuck but after a couple of minutes the first bolt started to move and after that the rest came off reasonably easily. The last one (as always) was a complete bugger. It had the worst access which only allowed a small degree of movement at the wrench. After about another 10 minutes the last bolt came off and I was feeling rather proud of myself.
I didn't realise that I'd have another 15 minutes struggling to actually remove the cat from the exhaust system but eventually it came away and that was the end of the hard work.
The replacement pipe is just the right size and after a little messing about getting it lined up the right way and sliding the gaskets in, it bolted in in a few minutes. After this I started the engine to make sure it wasn't leaking and after it had warmed up a little I tightened the bolts once more.
The undertray went back on without a problem and that was that. All-in-all it took 2 hours to do the job.
Due to other commitments over the weekend I didn't get to drive the car for over 24 hours which was torture! But it was worth it, it sounds lovely without being intrusive on the motorway and there's more power available right across the rev-range. It also revs a couple of hundred RPM higher and 2nd gear has seen the rev-limiter more than a few times since.
It's good to get your hands dirty now and again ;-)
Tools I used:
Socket set: 6mm, 10mm, 15m, 17mm
Spanner: 15mm, 17mm
Allen key: 6mm
Fitting EBD 4-2-1 Exhaust Manifold
1st August 2001Just picked up this thread after being out of the office today...
I bought an EBD manifold from Geary last weekend and had it fitted my my local mechanic yesterday. It's the latest EBD model with a double slip joint so combat the engine movement problems. The primaries are slightly (1") shorter and the 2-1 section is quite different where the slip joint is located.
I don't have the car back yet (other stuff needs doing) but I got a quick report on how it went. The heat shield and oil filter needed to come off for fitting and the engine had to be lifted slightly (just by loosening two of the mounts) to allow the manifold to meet the engine.
I wish I could have shown him this thread before he started - might have saved me some labour!!! There's no heat wrap so I'll have to see how close the manifold gets to the alternator. Mine's only a standard car with air filter and cat-rep-pipe so hopefully it won't be too hot?
I'm gonna try to get a quick drive tomorrow morning if he's not working on it.
The lambda sensor came out OK but stripped the old manifold thread on the way out. The lambda sensor on the END manifold is positioned about 4" away from the cat end which meant they had to re-wire and re-route the sensor cable.
Sounds like I'm looking at 5+ hours labour (thank god it isn't at Lotus dealer prices!).
My mechanic is located in Stevenage and is happy to do the job again. I'll try to get a fixed price for fitting if anyone is interested.
Standard Airbox Trunking Mod
14th August 2001My standard S1 still runs the original airbox with a K&N panel filter. I recently discovered at Emerald that the cold air hose was hanging down into the engine bay and not fixed to the side air scoop. So last week I set about to fix it.
I realised that there was no way I would be able to get a couple of tie wraps on the end of the hose without removing the airbox. So I did that and gave it a good clean at the same time. With the airbox removed I could see that there was a much more direct route to the air scoop than was being used.
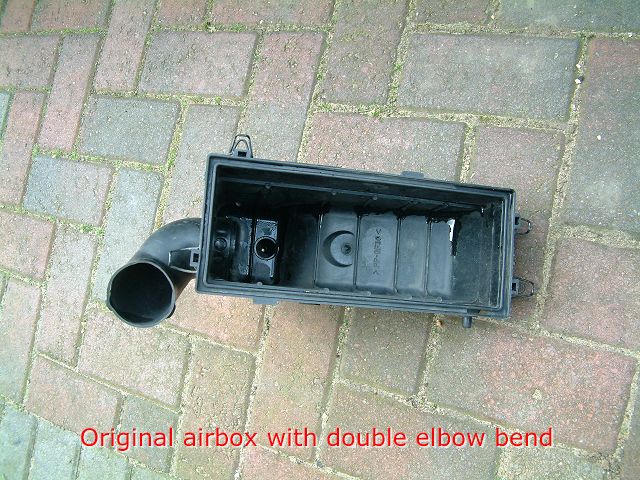
The original configuration of the air hose was to leave the airbox at 90° then turn upwards at 90° to the top of the engine bay at which point it turns 180° around the black metal tube before heading towards the air scoop. I'm at a loss to understand why it takes such a convoluted route.
It looked to me that I could take an almost direct path from the first 90° bend straight to the air scoop. But when I offered this up there was too much hose and it just bent itself into a long curve. So I chopped about 4" from the end of the air hose and tried again. I could probably lose another inch but I didn't want to leave myself too short.
So I hooked a couple of cable ties to the end of the hose, attached it to the air scoop and fixed the airbox back in place.
And it seems to have made a noticable difference. It certainly sounds a bit louder and I reckon its made a modest power improvement (but that could just be the noise). Either way, I feel happy that I've improved the path of airflow from the scoop to the airbox.
13th May 2002
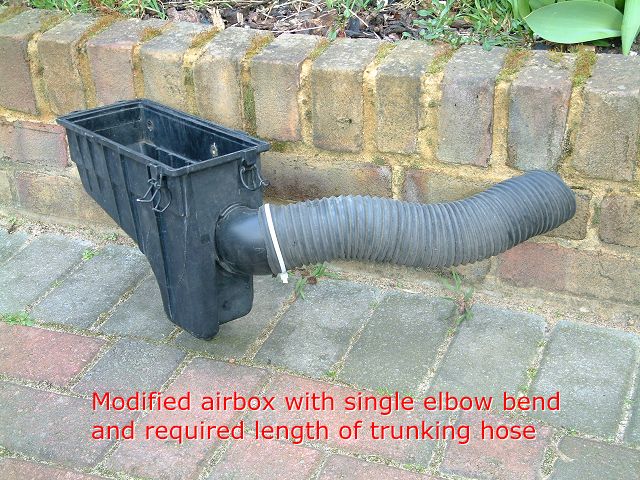
It's quite easy to re-route the standard airbox trunking more directly and cut off about half of the trunking hose.
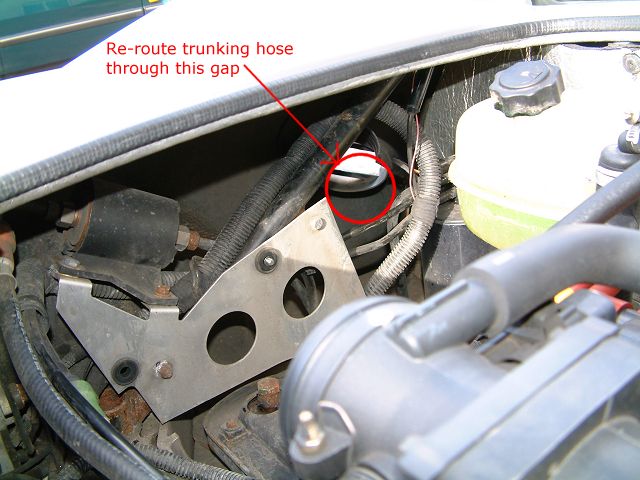
The entry to the airbox has some plastic tubing elbow bend that points upwards. If you take a hacksaw to this and cut back to about 45-degrees then you can direct the trunking hose underneath the rollover bar strut and in an almost straight line to the intake scoop.
Be careful how much of the elbow bend you cut off. The internal diameter increases as it gets nearer the airbox so if you remove too much the original 60mm trunking hose will not fit over the elbow bend. Interestingly, as the elbow bend meets the airbox, the internal diameter is equivelant to 67mm (it's an oval). That's an increase of 32% of the cross-sectional area over the trunking hose itself.
Pictures here:
Original
Modified
Trunking route
Fitting EBD/EliseParts Exhaust Silencer
26th February 2002My mild steel Janspeed was on the way out with tailpipes wobbling and thoroughly rusted clamps which meant that attempting adjustment would be the end of it. It had been on the car since new: 45k miles, 2 years, 3 months and 3 weeks (ish!).
I heard that Geary was having exhausts made. I'm all for trying out new and exciting stuff so I bought one of the first batch of production units on Saturday and went about fitting it the same day.
The EBD exhaust is fully stainless steel, including the flanges and clamps. The AccuSeal clamps are a work of art! It has a cylindical silencer with a single exit pipe, which becomes a twin exhaust at the exit. A single oval exhaust exit is also available. The silencer itself is repackable when it starts getting noisy(!) after a few years.
I didn't weight it but I reckon the mild steel Janspeed is about 50% heavier, I guess a lot of that is down to it having 2 exit pipes from the silencer. The Janspeed weighs 10kg according to my bathroom scales.
Bear in mind that I fitted this on a cold and windy February afternoon - it was a PAINFUL experience, especially when it started snowing :-(
So I will attempt to recreate it for you in tomr style: (stop reading when you get bored - I wish I had!)
Time check - 12:20
Reverse car onto ramps, chock front wheels
Remove undertray
Gasp at state of cat bolts
Spray WD40 around cat bolts
Have lunch (so far so good!)
Time check - 13:30
Apply torque wrench to easiest looking cat bolt - success!
Apply torque wrench to next easiest looking cat bolt - success!
Getting cocky, I try a super-rusted cat bolt
Bolt is so corroded that the 17mm socket is too big
I hammer on a 5/8" socket - success!
This is too easy
I leave the next easiest looking cat bolt till last
The next 2 super-rusted cat bolts come off with the 17mm socket
They are hard work but nothing I can't handle
So to the final (easy) cat bolt
It is in the most awkward position
I need to use an extension bar on the torque wrench but it sits against the manifold bracket
I try a regular socket wrench but I can't budge it
I switch back to the torque wrench and try harder
It starts to move!
It moves again - this is easy!
Something breaks
My 1/2" drive convertor for the torque wrench has sheared off
I swear but think "I've only got this last one to go, won't be a problem"
It starts to rain
I switch back to the socket wrench
I swear
I take up the sprinting position, trying to push the wrench with my foot
I push *really* hard with my hand
My hand hurts
I swear again
I find a hammer
No joy
I repeat the last 6 actions (twice)
Time check - 15:00
I drag all the tools off the drive and jump in the Saab down to my local motor factors
I buy a 1/2" drive 17mm socket for the torque wrench (Ł4)
Drag all the tools back onto the drive
Apply torque wrench to final cat bolt - push hard - success!
Phew!
Cat-pipe drops out along with a pair of manky looking gaskets
I go and have a look at the new exhaust to cheer me up (I will take a photo later before I put it on)
Now to remove the old exhaust
I will need to remove the rubber brackets
It's dark up there
I figure that if I just remove the offside bracket I can slide the exhaust out of the nearside one without removing it
I get to work on the offside bracket
It's hard work - I hadn't applied WD40 up here
It starts to snow, the wind is blowing it on me under the car
I hate this
I change position to get my head off the ground
The first bolt comes off
The second bolt is harder
The wrench slips and I punch myself in the face
My upper lip is bleeding
I start to cry
Eventually the second bolt comes off
I slide the exhaust over to the offside to remove it
It won't come out
The tailpipes hit against the clamshell with 5mm to go
The sun is starting to go down
I wriggle and twist the exhaust to free it from the nearside bracket but no joy
I cannot even see the bracket bolts and there is a mess of pipework between me and them
Crunch time
I either cut the bastard off or put it back together and give up
Give up? Never!
I get a hacksaw
I decide to cut the exhaust hanger just below the bracket
I start sawing
...time passes...
I'm still sawing
It's getting dark
I finally cut through and the exhaust is removed
I never want to see that piece of shit again
I fetch the EBD exhaust (too dark to take a photo)
I assemble the clamps to so that the tailpipe angle and flange orientation is roughly correct
"Flange orientation" (Mmmm)
The exhaust won't slide in because of the same reason the Janspeed wouldn't slide out
I remove the tailpipe section and slide the silencer section in place
I assemble the tailpipes in situ and gently tighten the clamps
I take a look at the position of the tailpipes in the clam - perfect!
I fully tighten the clamps
Nearly there!
It's dark - I get a torch
I offer up the cat pipe - perfect fit!
I fetch the new cat bolts and gaskets
First gasket slides in and bolt to retain it
Next bolt goes up, falls off, land on my forehead
I swear
Try again, falls off, I flinch like a deranged child
Try again - success!
Struggle with remaining bolts and gasket, several narrowly missing my bruised head
Fully tighten all the cat bolts
I can't feel my toes
Come out from under car to recover before starting her up to admire my work
Notice the cat bracket hanger lying on the ground - I have forgotten to put it back on
Consider throwing it away and pretending I didn't see it
Go inside to warm up
My toes hurt
Go back outside
Remove cat-pipe
Assemble cat bracket hanger
Refit cat-pipe (no injuries this time - I must be getting good at it)
Climb out from under car
Start engine!
Nice sound!!!
Check for leaks - none!
Drag tools off drive
Drive car off ramps (my left foot really hurts when I use the clutch)
Go for a drive round the block
Very nice sound!!!
Park car, go inside
Time check - ~18:30
Run a bath but my feet are too cold to put in hot water
30 minutes later I can start to feel them again and they hurt!
Go to sleep
Next morning, time check - 08:30
Reverse car onto ramps, chock front wheels
Check for leaks again, re-tighten all cat bolts
Take a few photos (links below)
Apply coppergrease to all cat bolts, clamps and exhaust brackets
Refit undertray
Start engine
Drive off ramps...
Wheel slips
More revs
Big noise and rear nearside of the car gently falls to the ground
Climb out of car (with difficulty) and front offside wheel lifts off the ground
Notice nearside ramp 3 metres behind car
Wife comes outside after hearing noise and nonchalantly says "you've still got the chocks in"
Doh!
I wonder how I could have been so stupid and how I can fix this mess
I remove the chocks(!)
Climb back into car and drive gently off the one remaining ramp
Phew! (I am a compelte muppet)
Job done - I never want to do that again
Time check - 09:30
I went for a good drive after that. It's certainly louder than the Janspeed, although I think that the silencer is about the same size. Up to about 3000rpm it is very similar but with a noticably deeper an throatier tone (maybe 10-15% louder). Beyond 3000rpm it is quite different - the throaty noise becomes more of a bark and the noise level increases to about 30% louder than the Janspeed. Very satisfying on full power upshifts. Bear in mind I have the EBD 4-2-1 exhaust manifold and MotoBuild silenced cat-pipe so my experience may well be different to other configurations.
Overall I am very impressed with the EBD exhaust. The lightweight, high-quality construction. All stainless steel components, ease of fitting and quality noise. I might even go so far to say that throttle response at low revs has been increased but I suspect that has more to do with a tired Janspeed...
Pictures here:
Fitted Nylatron Wishbone Bushes
17 April 2002I had Geary's Nylatron wishbone bushes fitted a few weeks back. They weren't fitted quite right but now they've been refitted I can report my findings.
I replaced the bushes because I suspected they were worn. I was suffering from poor traction over broken surfaces and the suspension had generally become more 'crashy'. This is on my standard 99MY car at 46k miles on original dampers (rears replaced at 10k).
I'm happy to say that the bushes have indeed solved the traction problem. A good example is accelerating over rumble-strips as you leave a village. Previously I would plan my gearchanges so that I wouldn't be accelerating over them - the banging of the rear suspension was unbearable. Now it's not a problem and I can power away over the rumble-strips without any problems.
Another bonus is the car is much more stable over high-speed yumps and humpback bridges etc. The car is definitely more planted and I can take these yumps at higher speeds than before. The same is true for big holes in the road. The car rides over them much better without making a big fuss.
Handling and feedback is the most difficult to quantify. The thing that I've noticed the most is that the detail you get from the steering wheel is much better. I can feel the road surface and understand exactly what is under the front wheels much better without it being an intrusion. If I take a corner and guide the car to the white line on the exit I can feel the line painted on the road. I don't remember being able to do that before; at least not to the same level of detail. I would say that the finesse of the handling is better. It feels that bit more sophisticated and adjustable. Not a huge amount but it's definitely confidence-building and I've found myself driving 5mph faster everywhere (not in built-up areas obviously!).
Downsides? None really. I was worried about extra road noise and worse ride quality. The road noise is unchanged and on balance ride quality is improved. The car is maybe a little more fidgety over small undulations but it rides much better over bad surfaces. I have a small squeak/creak from the passenger footwell area but this could be the ARB creaking. I will get some spray grease on it this weekend, whatever it is.
Spax/Spyder suspension -> Spax/Spax suspension
28th January 2003I've been running the Spax/Spyder suspension for about 10k miles. Basically it consists of adjustable Spax RSX dampers with Spyder Engineering springs at S1 LSS spring rates.
My reasons for fitting this kit were mainly budget. My original dampers were degrading and I had a very modest funds to replace them. The Spax/Spyder kit appealed from the promise that it would deliver LSS levels of ride quality and could be stiffened up for track use.
At the time I had it fitted I plumped for a 115/125mm ride height. I also had the Spyder adjustable ARB fitted, played a little with settings and left it on full-stiff. Geometry was set to 340R road settings (LSS with more front camber).
I quickly found that I needed to run a surprising amount of damping to maintain a sufficient amount of body control. The car would bottom out a lot before I wound up the damping. My ideal dry road setting was 16/23 clicks. The dampers have a maximum of 28 clicks available. This resulted in nice, neutral handling and great turn-in. I was very happy with it on road and track apart from the awful ride quality. Low speed ride was not nice at all but I was happy to live with it. But at the back of my mind I knew that running so much damping meant that something was wrong and I considered changing to stiffer springs.
When winter hit the ride quality really started to piss me off. Without being able to lean on the suspension, the harsh ride was unacceptable. I wound the dampers back to 15/21 clicks which helped somewhat but wasn't the solution I was looking for. My perception was also that I was running with too much rebound damping. In order to stop the car bottoming out so much I increased the damping. This increases bump and rebound at the same time. It was bump I was trying to fix but I think I was getting too much rebound. This became apparant over poor surfaces where traction was affected. It was also very difficult to put the power down on trackside kerbs (which felt awful).
So I looked into stiffer springs. My thinking being that I could reduce the damping as the springs would offer more resistance to bottoming out etc. My knowledge of car setup and suspension is *very* limited but this seemed like the right way to go. Spax provide their own springs for the Elise damper kit and these, I was told by Spyder, were much stiffer than the originals. I didn't know what the exact spring rates were but I knew that I wouldn't have to worry about sizes, ID's, open/closed lengths etc and a whole bunch of other stuff I didn't understand. I bought a set from Spyder.
The Spax springs come with helpers and are purple! The springs themselves are marked:
Front: A6.53500
Rear: A74000
My guess is that these relate to the stiffness, fronts 53.5Nmm and rears 75Nmm? That equates to 305/428 lbft in old money which sounds like a reasonable track-oriented setup to me. Fronts maybe a little soft?
I took a day to fit them. One at a time so I could keep the ride height correct without chasing round the car. Went quite well apart from my losing my locking wheelnut adaptor on the last corner when I went for a spin round the block to settle the suspension. Thankfully it was the last wheel so I could finish the job but it drove me crazy for the next 2 days until I could get a replacement. Not worth risking driving the car on 3 wheelnuts for the sake of Ł7.
So today I took the car to work. I started with 10/15 clicks which felt fine until I started pushing and the rear was way too soft. After a little play at lunchtime I've got to 11/18 and that feels much better. There are still adjustments to be made but it's more balanced now. I suspect the ride height must have be a bit out because it feels like the tyres are on-edge as if I've affected the camber. I'll get a geo check this weekend. But already I'm much happier with the ride quality, especially at low speed. The final 40mph stretch into work has a truly awful road surface with sunken manhole covers and ripples across the road etc. Previously, my stomach would shake internally down here (rather unpleasant) but today it's much more comfortable!
I suspect I will have to tighten things up a bit for track use but my initial impressions are that ride quality is much improved. It will take a few miles for the tyres to settle down and hopefully I haven't thrown the geo wildly out of spec. I'm at Brands Hatch this Friday so I'm hoping there are handling benefits to be had as well.
Looking forward to trying them in anger!
|
© 10-Nov-2002 |